How to Use Request Tracker
The Request Tracker is how VCN keeps track of all incoming requests from clients, commonly called RT. The RT tracks emails sent to the VCN help email address, voicemails left at the VCN helpline and other records added by staff and volunteers. It’s a web-based ticket system that anyone with internet access can utilize.
You will need an approved VCN account for staff and volunteers before you can access RT. Ask your supervisor to create an account for you and grant you access to the RT.
To access the RT, you first need to:
- Follow this link: https://rt.vcn.bc.ca/rt, or click on the link on the right side of the page titled “WebRT”.
- Make sure to check off: Send authentication info to all scripts on this server.
- Login in with your VCN account information.
Home page
Once you log in, RT will load all open requests that may need to be resolved.
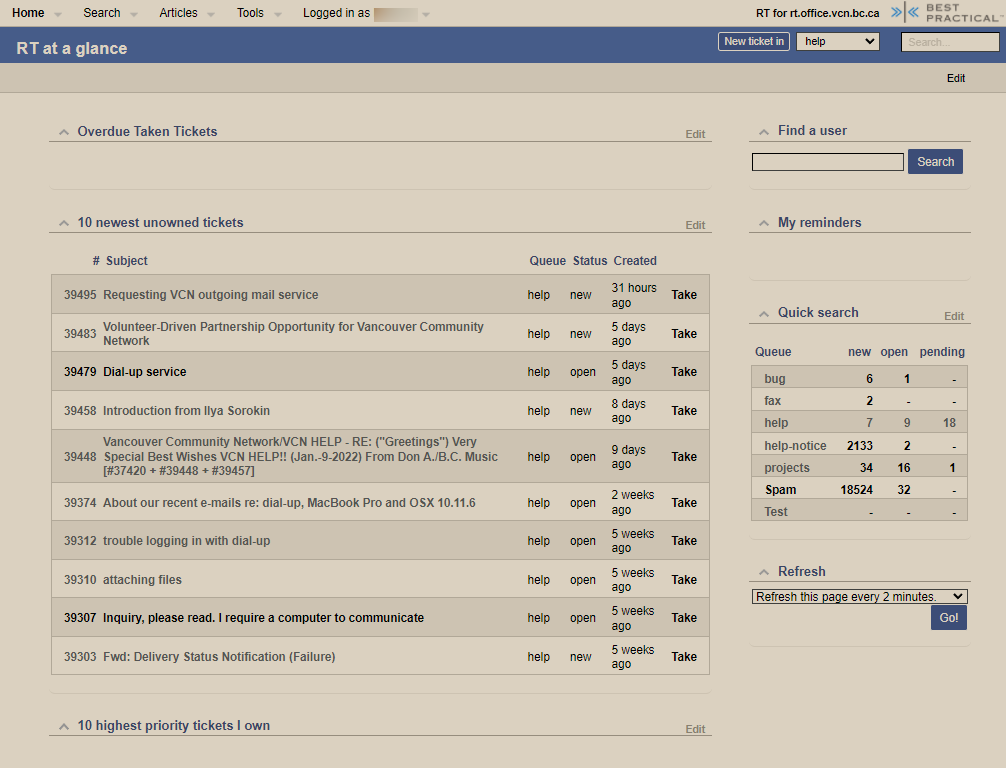
Here, you will find tickets organized into sections from newest to oldest, personalized for your account, these sections include:
- Overdue Taken Tickets
- 10 newest unowned tickets
- 10 highest priority tickets I own
- Tickets I Worked On
- Bookmarked Tickets
- Open Owned Tickets
Queues
Each ticket is also sectioned into different queues depending on what the ticket needs. The list of most common queues can be found on the right side of the webpage near the top.

The list of queues are:
- Bug: Bugs and issues with anything on VCN’s end, such as webpages or phone lines
- Fax: Related to transcripts sent or received through fax
- Help: The general help queue, most issues the clients encounter and bring in will be put under this queue
- Help-notice: Automatic notifications for tax receipts and full inboxes on VCN accounts
- Projects: VCN projects to improve the service to clients
- Spam: spam emails and messages
- Sys-admin: for system administration
- Techteam: tickets related to the VCN tech team responsible for providing IT and helpdesk services to clients.
- Test: tickets for testing purposes should be placed in this queue to avoid confusion
- Webteam: tickets related to the VCN web team responsible for providing website design, development, maintenance and WordPress related services to clients.
- Donations: tickets about donations made to VCN
Staff and volunteers will be mostly using the Help and the Spam queue.
Ticket details
Next, when you find a ticket you wish to help resolve, you can click on the link. It will show you more details about the ticket you picked.

Here, there’re a few fields to see and understand. It’s not necessary to edit and fill in all the fields, but some are important to help everyone understand what a ticket is about.
Basic tab
Clicking the Basics tab will allow you to change some of the basic information in the ticket, this includes:
- Subject: The title of the ticket, it is a good idea to add in the client’s number phone to the end of the title if a number is given. The format will look like this: (subject text <phone number>). The phone number can usually be found in the subject itself if it’s a voice message, or in the ‘History’ section of the ticket page, which is farther down
- ID: The identification number for the ticket, each number is unique and can be easily found in our system
- Status: The current status of a ticket. These include:
- New: The ticket just came in and hasn’t been looked at yet
- Open: The ticket has been looked at by staff or volunteers
- Pending: staff or volunteers have seen the ticket and responded, it’s waiting for the client to reply back
- Resolved: The ticket and its issue has been resolved
- Rejected: The ticket and its issue does require the service provided by VCN and doesn’t need to be worked on
- Queue: As explained earlier, it puts tickets into sections depending on its type
- Owner: Whoever working on the ticket at the moment
There’re some more fields in the Basics tab, but there’s no need to fill those in. There’s also no need to fill in the ‘Custom Fields’ section.

After you are done editing the ticket basics, you can save the changes by clicking the ‘save changes’ button at the bottom right of the page and return to the ticket page. There’s no need to fill in the ‘Reminders’ and the ‘Dates’ tab.
‘People’ tab
Under the ‘People’ tab, you can edit the watchers to add or remove email addresses for the clients who will receive an email regarding an update to the ticket.

Attachment tab
When a voicemail message is left by the client, it’ll be under the ‘Attachments’ tab, you can listen to it by clicking the link.

Link tab
The last tab to know is the ‘Links’ tab, by clicking on it, you’ll be shown this page to modify the links to the current ticket.

The only thing to note here is the ‘Merge’ field near the bottom. It lets you to merge the current ticket into an older ticket. It’s for situations when a client emails or calls regarding the same issue, the system will automatically create two separate tickets despite the issue being the same. The Merge function combines the tickets, so there won’t be two tickets about the same issue in the system.
To merge the tickets, input the ticket ID of the first ticket into the field. This is an irreversible process, so make sure you are not mistaken about the tickets or their ID.
Conversation history
Next, by scrolling down through the ticket page, you can see the history of the communication between the client and the VCN staff or volunteers. This section is pretty self-explanatory, make sure to pay attention to the subject of each section to see who it is from. Also, pay attention to the ‘to’ and ‘from’ sections in an email to see who is messaging who.

Actions
Once you understand the nature of the issue and wish to resolve it, you can do it through the ‘Action’ dropdown menu near the top right of the page.

In here, you have a few options:
- Reply: Send an email reply to the client. This option might not be the best if the client called into VCN
- Comment: Add a comment to the history section of the ticket. This is only for internal staff and volunteers to see, and will not be send to the client
- Forward: Forward the ticket to another email address
- Reply and wait: Same function as ‘Reply’, except the ticket status will also be set to ‘pending’
- Resolve: Mark the ticket as resolved
- Reject: Mark the ticket as rejected
- Take: Take ownership of the ticket, same function as setting yourself as the owner in the ‘Basics’ tab
Eventually, when you have solved the ticket and you’re sure there will be no issues remaining for the client, you should set the ticket as resolved and move on to the next.